
Run ExifTool Commands on Photos in Photo Mechanic using macOS Automator
Right off the top, I need to say this tip is Mac-only, because it makes use of Automator in macOS. There may be something similar in Windows, but I am not familiar enough with that to say if this is possible.
With that disclaimer out of the way, this tip will describe how to use Automator to create a “droplet” that will apply an ExifTool command to photos in Photo Mechanic. If you’ve read this far, I will assume you’re familiar with ExifTool, but if not: It’s a command-line utility written by Phil Harvey for viewing and editing EXIF data in digital photos. (Note: ExifTool can be run just fine on Windows as well as Mac.) Photo Mechanic, in general, treats EXIF data as sacrosanct and is not built to edit that particular type of metadata, but sometimes there are very helpful reasons you might want to work directly with EXIF data, and ExifTool is by far the most powerful tool for doing that. If you have certain ExifTool commands that you use regularly and want to streamline your workflow by running those commands inside of Photo Mechanic, you can.
Some types of repetitive tasks you might want to use ExifTool for:
- Copying information from proprietary “MakerNote” EXIF tags into standard IPTC fields
- Adding missing EXIF data for photos taken with vintage lenses adapted for digital bodies
- Adding EXIF data to scans of film negatives to add camera and lens information
This tip is not going to go into the installation and use of ExifTool. There are lots of other resources out there for that. (https://exiftool.org/#links) But if you are comfortable using ExifTool, we’re going to show you how you can run ExifTool commands on photos in Photo Mechanic.
First, we’re going to use Automator in macOS to create an ExifTool droplet. This will end up being a standalone app that will run a certain shell script on any files that are sent to it, or dropped onto it.
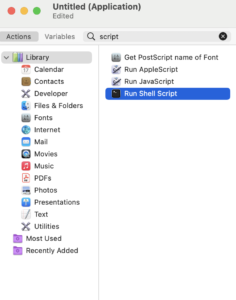
In macOS Automator, start a new application:
File > New
Choose “Application”
In the Actions pane, you can search for “Run Shell Script” and select that
In the Shell script area, set the shell to /bin/bash
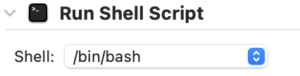
And set “Pass input” to “as arguments”
Now for the script itself, it is very basic. When you set “Pass input” to “as arguments” that means if you send a list of files to the droplet, it will create an array ($@) of all those files. So with these two lines, we’ll tell our script that we’re going to run the script on each item in that list
for f in “$@”
do
Then we’ll type in the ExifTool command that we want to run, followed by the item in the list of filenames “@f” (in quotes so that it can handle any spaces in the directory path or filenames)
/usr/local/bin/exiftool -overwrite_original “-Subject+<Saturation” “$f”
Note that I added the full path to where ExifTool is installed.
In this example, the ExifTool command I use is specific to Fujifilm cameras. Fujis are well-loved for their film simulations, and they write the name of the film simulation into the “Maker Note” of the EXIF data under the Saturation tag. This ExifTool command copies the contents of the Saturation tag to the Subject tag and appends it to anything already there. The Subject tag shows up as Keywords in Photo Mechanic. I’ve also chosen to overwrite the original file since ExifTool will default to creating a copy of the file. The point, though, is that you can add any ExifTool command that you want to do into this script.
And then we have to end the script by saying:
done
Here’s what Automator looks like when everything is added
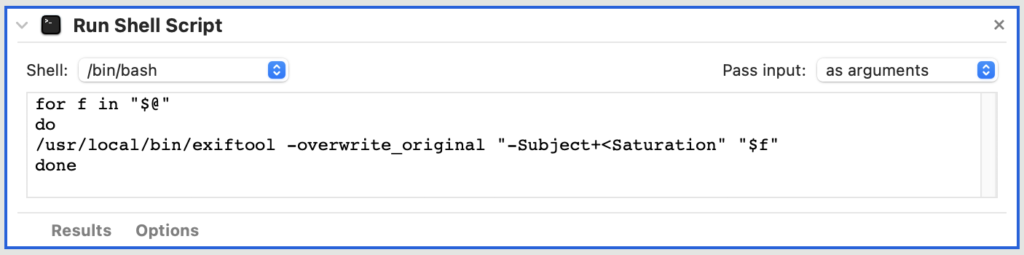
(Note that the $f is on the same line with the exiftool command.) Now you just have to save the app in Automator (File > Save). I called this one “FilmSim.” You should create a dedicated folder for the droplets that you create. You’ll tell Photo Mechanic where that folder is to look for droplets. In Photo Mechanic go to Preferences > Launching and at the bottom of that screen, you can select the location of your droplets. Note this was originally restricted to Photoshop droplets, but Automator droplets can also go here. In this example, I’ve created a folder called ExiftoolDroplets
Once the Folder exists and there are droplets in there, you can apply them in Photo Mechanic via the contact menu, usually accessed via right-click or control-click (macOS). So you can select any files in Photo Mechanic and send them to your droplet to apply that ExifTool command. Note: If doing this on a large number of files, it may take some time. You may see a spinning gear in your Mac’s menu bar, indicating that Automator is doing its thing.

After running the “FilmSim” droplet, I now see the film simulation in that item’s keywords.

Creating ExifTool droplets can really expand what you can do in Photo Mechanic.