
Using Automator with Photo Mechanic to quickly Zip images on Mac
I recently photographed an event for a client and they asked me to send them 5-10 images right after the event for sharing on social media. This is not an uncommon request, of course, but they also requested that the images be zipped. This, too, is fairly common, but I realized I didn’t have a really streamlined way to do that in Photo Mechanic. On a Mac, it is fairly easy to select images in Finder and right-click and choose “Compress n items.” What, I wondered, was the fastest way in Photo Mechanic to get images into a Zip archive when looking at a contact sheet with a few hundred images?
I first tried configuring macOS Archive Utility as an “external editor” in Photo Mechanic, but that resulted in Archive Utility compressing each image individually, so I turned to Automator (A tool built into all modern Macs) and came up with a ludicrously simple app that seems to work. Here’s how I did it. (Note that I am on Mojave. I am not sure how much Automator differs in other versions of macOS, and I’m not Automator guru, so if you have any Automator tips, please share with me.)
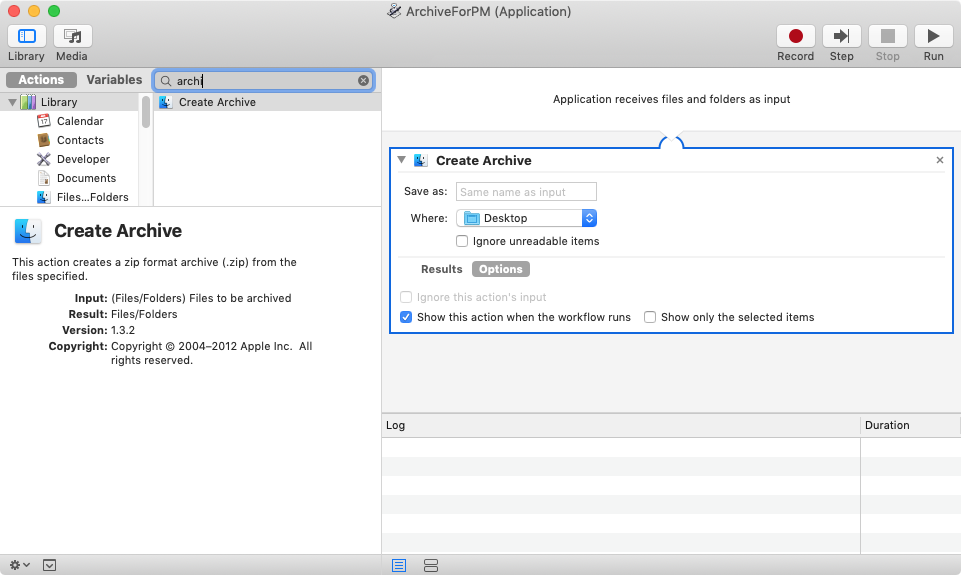
First, I whipped up the most basic Automator app ever.
- Open Automator
- If asked to choose a type of document, select Application
- In the left pane, with Actions selected, find the “Create Archive” action. You can use the search box to get there quickly
- Drag Create Archive into your Application
- If you never care about naming your Archive, you can pick a name to always use. For me I just left that blank, because in the next step, there is a way to have the app ask you for a name when you create it
- Check the box for “Show this action when the workflow runs” If you entered a name in the above step, you could leave this unchecked.
- Save your new app. I named mine “ArchiveForPM” and put it in my Applications folder. (File format should be Application)
Now, you have a handy app. Here’s how I configured Photo Mechanic to use it:
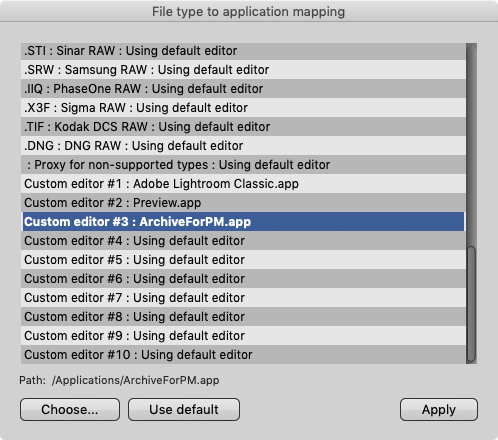
- In Photo Mechanic, open Preferences (cmd-,)
- Go to “Launching”
- Find the section “Assign specific editing applications for each file type” and click “Set…”
- Scroll down the long list of filetypes until you get to get to the Custom Editor slots
- Pick an unused slot and click “Choose..”
- Navigate to wherever you saved your app. I simply used the default Applications folder.
- Click “Apply” then “OK” to close Preferences
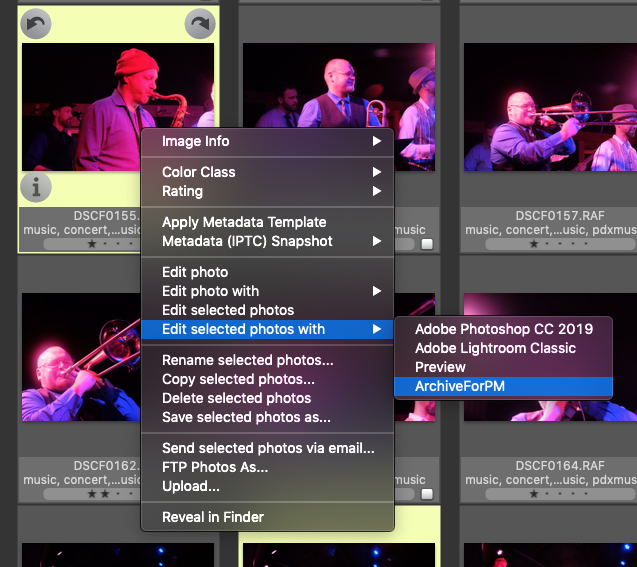
Now, whenever you are looking at a contact sheet in Photo Mechanic, you can select images via your favorite method, right-click and choose “Edit Selected Photos with…” and choose “ArchiveForPM”
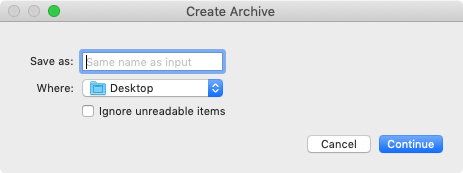
You’ll be able to enter a name and destination for your Zip archive. This should even work if you’re looking at a contact sheet of images from different folders (meaning this is likely faster than doing this in Finder.) One thing to remember is that there is no progress indicator while the Automator app is running, so if you’re archiving up a lot of images, you won’t know if things are running or how much time is left, and it may take a while. I recommend testing this after you set it up by zipping up a few images first just so you can see it working. Also, I believe you could save your automator app to your Desktop and drag images to it. This might be fast for some people.
This is an example of how Photo Mechanic has lots of ways to work with other software to help you get things done faster. Making it possible to configure external editors can really help save steps in a workflow.
Unfortunately, I don’t know of a similar solution for Windows users, but if you do, let me know. Automator experts can probably come up with more features as well, but this one is so simple and works for me.
Mick
Director of Marketing
Camera Bits